A new sink can enhance a bathroom and give it individuality. At the same time, the installation can be done quite easily by yourself. This saves money and gives DIYers new incentive for projects. How exactly the assembly works and what is to be considered thereby reveals this article.
Project washbasin assembly: What tools are needed
.
Before proceeding to the dismantling of an old sink and the subsequent installation, it is important to provide all the tools and supplies. In this way, a smooth flow of the work steps is guaranteed.
Checklist:
- Washbasin
- Siphon
- Faucet
- corner valves if necessary
- drain
- sealing paste
- hemp
- Sanitary silicone and cartridge press
- masking tape
- drill
- open-end wrench
- Water pump pliers
- Pump pliers
- Tile drill
- hammer
- Centre punch
- Folding rule
- Spirit level
- Pencil
- Trowel
The preliminary work: Measure, buy, disassemble
.
In order to make a decision on a new sink, measurements are crucial. Here, the following measurements are needed to ensure a smooth sink replacement:
- Overall width
- mounting distance
- Drain and inlet
- Distance from floor to top edge
Once these dimensions are known, you can purchase a corresponding new model. The next step is to dismantle the old sink. Whether a model is chosen that corresponds to the same dimensions or has completely new dimensions can be decided individually. Same dimensions simply facilitate the assembly, deviating dimensions provide additional, but mostly easy to perform steps.
The dismantling of the old sink
.
1) To avoid flooding in the bathroom, the main faucet is closed before each subsequent step. After that, you let the pipes run empty. Next, close the angle valves, which are located under the sink.
2) Before proceeding with disassembly, a shallow plastic tub - or optionally a bucket or bowl - is placed under the siphon and water drain. In this way, residual water is safely collected during dismantling. Now the siphon is unscrewed, closely followed by the entire water drain of the old basin.
3) After removing the drains, the fittings are removed. To do this, disconnect the connections to the corner valves. Then unscrew the screws from the faucet from below. Now this can be easily removed.
4) Finally, the sink is removed. To do this, loosen the fastening screws and simply remove the old sink from the wall. Please hold the sink as straight as possible and pull it towards your own body. In this way, the hanger bolts remain intact and can be reused with the same mounting distance and height of the new sink. If a new washbasin is used that has a different height and spacing, the hanger bolts must be removed accordingly. Finally, remove any residual silicone/acrylic joint. This works easiest with a cutter knife or a thin scraper.
The installation of a new sink with deviating dimensions
.
To install a new sink with deviating dimensions, further preparatory measures are required.
1) If necessary, measure the mounting height of the new sink. As a rule, this is so that the upper edge of the new sink is about 85 cm above the floor.
2) Center the drain before drilling the holes. This can be done easily and quickly with a template. To do this, simply use a piece of paper or cardboard that corresponds to the total length between the holes of the new sink. Noon align and mark.
3) Using a spirit level, once again align the drilling points.
4) Mask the drilling points with masking tape. This prevents the drill from slipping.
5) Prepare the drill hole with a center punch. Then drill the hole.
Notes on drilling:
Never use a percussion drill. Always drill through tiles at low speed and ideally with a tile drill. If the tile is drilled through, the percussion mechanism is activated and the wall is drilled through further.
6) Insert the dowels into the drill holes and check the fit.
7) Attach new hanger bolts. To do this, use an open-end wrench or pliers to screw in the screws until only da thread protrudes from the wall.
Assembly step 1: Attach the faucet to the new sink
.
As long as the sink has not yet been fixed to the wall, the faucet can be easily attached in a few steps.
1) Thread the faucet.
2) Attach gaskets and screw from the bottom. Here the advantage of performing this step before the final assembly on the wall becomes apparent.
Important:
Where and how many seals must be attached depends on the model. Therefore, it is mandatory to follow the manufacturer's instructions to ensure safe and proper installation of the fitting.
The key part: mounting the sink on the wall
.
1) Apply sealing putty. This measure compensates for unevenness on the wall and avoids tensile stress. To do this, simply apply the putty to the back of the sink. Suitable for this purpose is, for example, sanitary silicone.
2) Slide the washbasin onto the hanger bolts. Keep it as straight as possible to avoid tilting.
3) If possible, fix the new seat in place. A second person helps here by holding the sink in place. Improvised supports are also helpful. Make sure that they do not get in the way of further assembly.
4) Place plastic washers and nuts on the hanger bolts. Then tighten them hand-tight.
5) Check the fit of the basin using a spirit level. Correct if necessary. Work evenly/alternately left and right. This avoids stresses that could lead to material damage.
6) After correct seating: tighten nuts.
The final assembly: corner valves, hoses and drain
.
1) When setting new angle valves, proper sealing is essential. To do this, cover the threads with sealing paste and wrap them with hemp. Alternatively, Teflon tape can be used here. This step can be saved if self-sealing angle valves are mounted.
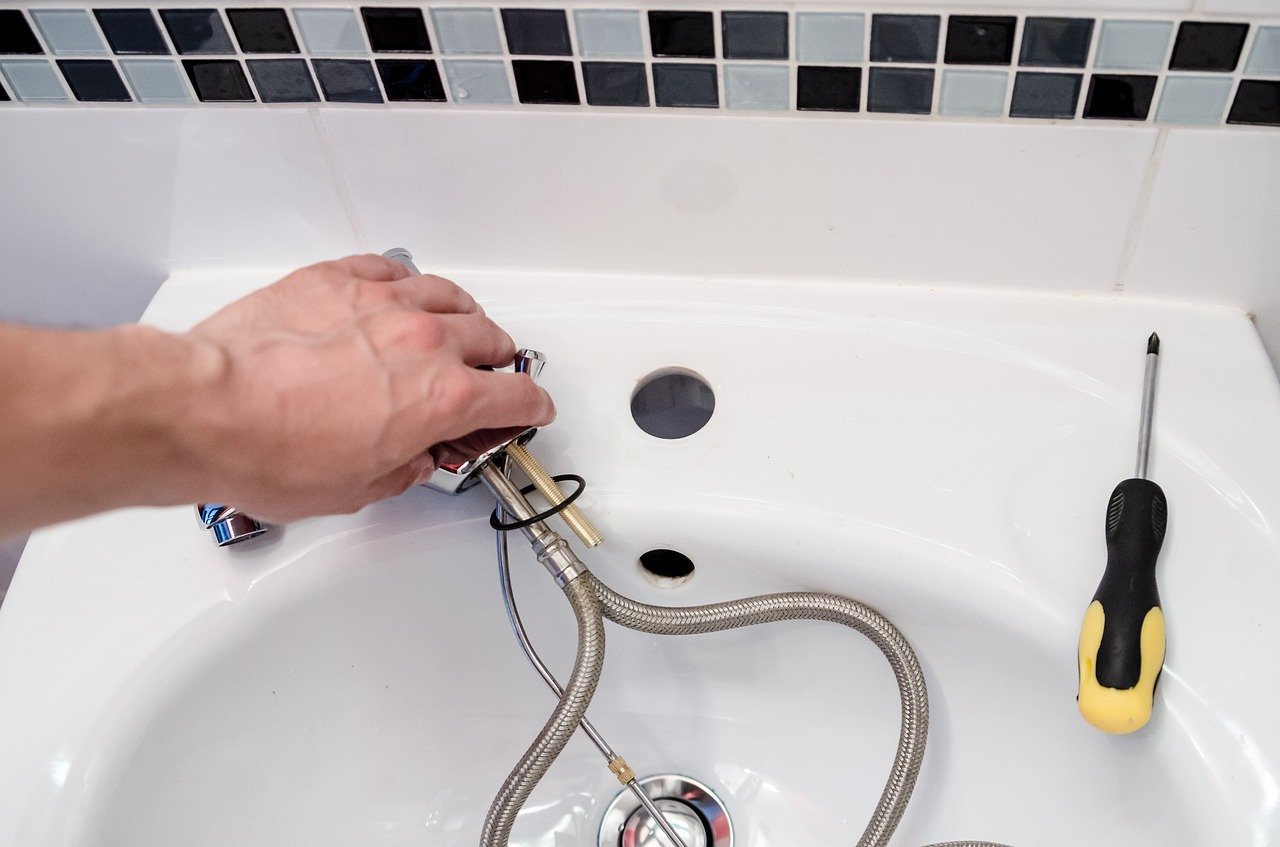
2) Attach the flex hoses. To do this, plug the hoses leading to the fitting onto the angle valves and tighten them with union nuts. Make sure which one is for the cold water supply and which one is for the hot water supply. If the old fitting is reused, check the existing hoses instead to rule out damage. Seals should be replaced in this case.
3) Insert the drain strainer of the drain valve. To do this, hold the drain strainer in the basin opening. Hold the lower part of the valve from below and screw both parts together from above.
Note:
Deviations in the procedure are possible. Therefore, observe the manufacturer's instructions!
4) Installation of the drain. To do this, connect the drain pipe to the existing wall drain. Seal by means of a rubber sleeve. Then connect the drain set and drain valve to each other. Caution: Make sure that the opening of the siphon housing is aligned with the wall. Readjust if necessary. Check the siphon rods - refer to the manufacturer's instructions.
5) Seal the transition to the wall. Sanitary silicone is used for this purpose. Refer to the manufacturer's instructions for use. Draw a joint using the cartridge. Then pull off and smooth with a joint smoother - moistened with washing-up liquid.
6) Final check. Open the angle valves and the main cock. Check that all connections of the inlet and outlet are tight.
With these instructions, installing a new sink will be a breeze and can be done even by non-professionals. It should be noted that the drilling of new boreholes and the installation of new hanger bolts are not necessary if the existing hanger bolts are reused.
Fig.: jarmoluk/pixabay.com
This website uses cookies. The cookie technolgy provides a good user expierence. We recommande you to accept this technolgy.
Information about Cookies

 A new sink can enhance a bathroom and give it individuality. At the same time, the installation can be done quite easily by yourself. This saves money and gives DIYers new incentive for projects. How exactly the assembly works and what is to be considered thereby reveals this article.